Pages

Wednesday, November 28, 2012

DIY Waterer Heater for Chickens

The Chicken Chick authors an award winning blog on life with chickens, farm living, DIY projects and tons of related topics.  She's Kathy Shea Mormino and her blog van be found at The Chicken Chick.  The following is a DIY waterer heater, quite timely for many of us who are starting to have freezing temps.  All credit for this post goes to Kathy Mormino.


NOV 15, 2011


Make a Cookie Tin Waterer Heater. Under $10, & 10 minutes in 3 steps!


Winter brings many challenges for the backyard chicken-keeper, and frozen water is chief among them.  You can make your own waterer heater for use with either metal or plastic waterers. It will cost less than $10, cost pennies to run and you can complete the project in under ten minutes. 

We had record-breaking, sub-zero temperatures for long periods of time in 2010 here in Connectictut and my waterers never iced over the way they used to without these heaters.  It doesn't seem as though a humble, 40 watt lightbulb should be able to produce enough warmth to keep the water in a plastic waterer from icing over, but remarkably, it does!

Supplies needed:
  • 10", metal cookie tin (available at most dollar & thrift stores & likely in your garage or basement)
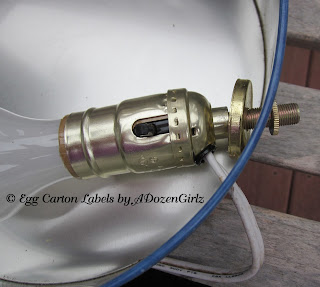
  • lamp assembly kit (available at all hardware, big box and home improvement centers OR buy a thrift store/tag sale lamp and take it apart)
  • 40 watt, incandescent light bulb
  • Drill with 3/8" drill bit
10" cookie tins can be purchased for $1 or less (or full of cookies for about $5!)

Lamp assembly parts.

Instructions:
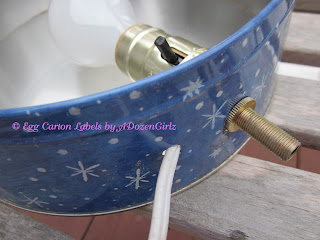
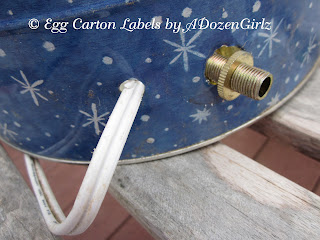
1. Drill two holes in the cookie tin adjacent to each other. String the lamp assembly plug through one hole and the threaded, lamp stem through the other as shown below.
 2. Tighten the screw on the stem of the lamp assembly and screw in the light bulb. Viola!
 TO USE:
Put the top on the cookie tin and place the tin on a cinder block either inside the coop or outside in the run.  Plug into a GFI outlet. Place metal or plastic waterer on top of the water heater when freezing temperatures are anticipated. Disconnect when not in use or use a ThermoCube to regulate power based upon temperature.

When I made my first cookie tin water heater, I found it difficult to believe that this device, which barely felt warm to the touch, could possibly do the intended job. I was only convinced the first frigid morning I went out into the run and found no ice ring to chip out of the waterer. You may have to try it to believe it too.
I invite you to follow my blog to get the latest posts delivered directly to your email inbox, Google dashboard, by NetworkedBlogs on Facebook or RSS feed! 


Tuesday, November 27, 2012

Someone You Know...

Almost completely unrelated to farming, gardening, etc. but a good explanation for the month-long lapse in the blog.  A long-ish video, but a good explanation of the disease.  And sometimes, it IS lupus.


Tuesday, October 30, 2012

Winter Garden Readiness

Farmer Paul built eight raised garden beds this spring in which we are raising asparagus, strawberries, a multitude of herbs, some vegetables that have more specific soil needs so are not grown in the regular vegetable garden and some medicinally useful perennials such as purple coneflower (aka echinacea)  with two more beds to spare for next years' development.


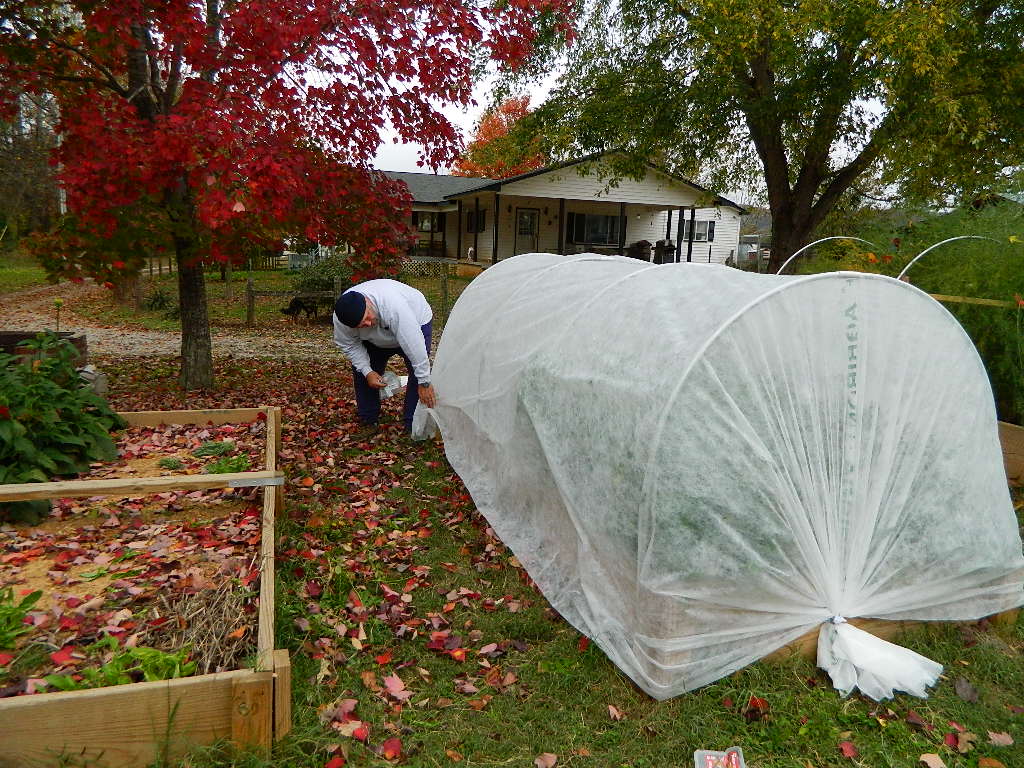
But alas, sweet summer has come and gone and last weekend was time to get ready for the first frost, with the goal of overwintering some of the hardier annual herbs and protecting the tender first year strawberries.  

First, we bent .5 inch galvanized metal electrical conduit into hoops using a fancy high tech hoop bender from Johnny's Seeds which made bending low greenhouse hoops very easy.


Then we secured the hoops over the beds:


Next we covered the beds with Agribon row cover that protects from freezing while allowing light transmission and rainwater through.


And then secured the lightweight fabric with snap clamps, again from Johnny's Seeds.

Gathered the Agribon at both ends so we could continue to easily access the plants inside as needed and tied it off using Cable Clamps.  

The beds were covered and the project completed in about three hours total work time.  Our own mini-greenhouses in less than half a day!


Friday, October 26, 2012

"Universal Studios Meets Disaster Readiness"

This would be like "Universal Studios Meets Disaster Readiness" says Darlene Turner, executive director of the Disaster Discovery Center project.  Quite possibly the coolest way to teach disaster readiness to both children and adults, the project is still in the fund raising stages, but garners support from various Utah public agencies.

The following article describes the intent of the museum - to provide simulated disasters in a safe environment so that children and adults can learn what to do before, during and after a natural disaster.

http://www.ksl.com/?nid=148&sid=22610763


SALT LAKE CITY — A place to have "fun" with disasters and learn at the same time: that's the premise of a new kind of museum that's in the works for Utah, the first of its kind anywhere in the world.
"This would be like Universal Studios meets disaster readiness," said Darlene Turner, executive director of the Disaster Discovery Center project.
Whether it's with fires, floods, tornadoes or earthquakes, nature has lots of ways to ruin your whole day, or your life. The proposed museum would offer a way to experience such events, in perfect safety, through elaborate simulations and special effects.
The goal would be to teach visitors how to deal with a disaster and how to prepare in advance.
Turner, a veteran of two decades in the museum industry, envisions a 30,000 square foot facility with numerous interactive exhibits, simulations and hands-on learning facilities.
She began planning the facility more than a year and a half ago. It was incorporated as the Disaster Safety Museum, Inc. a year ago. Turner has been quietly rounding up support from government agencies and educational institutions and expects to begin a fund-raising campaign next year.
Emergency preparedness officials are enthusiastic about the museum's potential as a teaching tool. "Any new way we have to get that information out is a bonus for us," said Steve Sautter of the Salt Lake County Emergency Operations Center. "It's hands-on rather than trying to get someone to read a pamphlet."
Kris Hamlet, deputy director of Utah's Department of Public Safety, sent Turner a letter of support in July. "We foresee added opportunities to get current and accurate information into the hands of our citizens," Hamlet wrote. "We look forward to our continued alliance with you in support of this project."

This would be like Universal Studios meets disaster readiness.
–Darlene Turner, executive director

As an example of the kind of exhibit that would be featured in the proposed museum, Turner said visitors might enter a room and experience a simulated tornado or earthquake. "All of a sudden that hits and the shaking starts," Turner said. "And you're experiencing the movement of this kind of experience. And then right after, things are going to shake off the walls and do all that kind of stuff."
After the shaking stops, the visitor would move on, perhaps to an outside area.
"You would exit and see the destruction that an earthquake might have done," Turner said. "You're going to see after-effects. How you crawl through spaces. How you help each other."
A brochure describes the Disaster Discovery Center as "a gathering place where fun meets emergency preparation."
Although the museum's planning materials describe the fun and excitement of disaster simulations, the overall emphasis is on educational opportunities for visitors.
"It creates an environment where they're not threatened but they're still getting the serious information about preparing for emergencies," Turner said.
An architectural firm has begun drawing up preliminary designs but no site has been selected for the proposed museum. With the fund-raising campaign still about a year away, it's likely to be several more years before the museum becomes a reality.

John Hollenhorst, Reporter
John Hollenhorst is a Senior Correspondent for KSL Television. He has won numerous awards over the years, including The National Headliners Award. The Society of Professional Journalists named him Utah's "Best TV Reporter" 3 years in a row. Full Bio »

Tuesday, October 23, 2012

Sugar Pea Farm PRODUCTS!


    Who doesn't love a real Tervis Tumbler?  Now the "knock-offs" sweat profusely on the outside of the cup, fail to keep cold drinks cold and hot drinks hot - so what's the point?   A not-so-cheap sweaty cup - yick.  

Tervis Tumbers are manufactured in Osprey, Florida and come with a LIFETIME guarantee!  Dishwasher-safe, too.  You drop 'em, they replace 'em.  They fog; they replace 'em.  These Sugar Pea Farm custom cups come in a 12 ounce size and are only available through this blog!  

Interested in supporting a small family farm?  

Contact me at sharon@mstn.biz!


Sunday, October 14, 2012

Chicken in Every Pot

Now I love a good sale.  On anything.  Even meat.  Our Dexter steers are about a year away from being ready to become food *sniff* so I'm always on the lookout for sales in meat cuts that we like.  Living in rural Tennessee has required some adjustments, especially when it comes to the local grocery.  However, Floyd's Cash Saver (below) is a real diamond in the rough.  It took me about a year to pay a visit to Floyd's, mainly because of the exterior and the fact that it isn't a big chain store.  However, I found that Floyd's meat department has real butchers on duty all the time and you can actually speak with them about what you want - and they'll actually do it.  Mr. Floyd is usually there, greeting and talking to the customers.  It's amazing!  Their meats are all 100% raised in the USA, all natural, no weird solutions or chemicals. Quite the find - rely local.


So, the sale.  Floyd's was celebrating an anniversary and had a huge sale in the meat department.  One of the best deals was on chicken - split breast cut, bone in with skin (um, yick!).  Luckily, my spouse is a skilled meat cutter and can turn that cut into boneless, skinless breasts that we then divide into two people sized portions.  Next we use a Foodsaver vaccuum sealer to package the portions and freeze.  Now after all of the boning and skinning, we have a hefty amount of chicken detritus.  Seemed like a good idea to turn the detritus into a very rich chicken stock/ broth.

The recipe:

Detritus (i.e. bones and skin) from 6 family size packages of split chicken breasts
Water to fill large stock pot
1 chopped onion
1 teaspoon celery seed (or fresh celery if you have it)
1 tablespoon fresh dried sage (grown here at Sugar Pea Farm!)
1 tablespoon salt
2 bay leaves

Toss it all in a large stock pot, cover, bring to a simmer.  Let simmer slowly for about two hours, adding water to fill as needed.  


Turn off, allow to cool enough to where you can handle the next steps without burning anyone.  Strain through cheesecloth into another vessel (i.e. large mixing bowl, another pot, whatever).


Put in refrigerator several hours or overnight.

Later (or the following morning) skim off any fat that has collected/ firmed up at the top of the bowl/ pot.  Strain through cheesecloth again if needed.

You can store the broth in a container of your choice in the refrigerator for 1-2 weeks or you can freeze it and have it last for several months.  I decided to use my leftover wine saving method, which is to pour it into ice cube trays and freeze.  After it has frozen solid in the tray, I dump the cubes into a freezer grade ziploc and then use in recipes as desired.


Keep in mind that this is a very rich stock - one ice cube packs the power of a can of regular chicken broth.  Use one ice cube and add about 8-9 ounces of water to equal one can of chicken broth.

This broth is rich, natural, preservative-free, and it tastes fabulous!  Great for risottos, rice dishes, casseroles, any time a recipe calls for chicken broth.  Hope you enjoy!