Pages

Friday, September 28, 2012

Randa Acts of Kindness

Couldn't be prouder of one of my sweet nieces, Miranda Ertsgaard Snyder (aka "Randa") as she was recently awarded the Department of Defense Meritorious Service Medal for her selfless volunteerism and commitment to helping others outside of the scope of her work in the Air Force.  Balancing life overseas, a new marriage, and an adorable baby, she still finds the time, drive, and energy to give more.   Randa joins the ranks of the likes of John McCain, Norman Schwarzkopf, and other notable veterans as the winner of this highly regarded and coveted award.  Having had the privilege of watching her grow from a "tween" to a young woman, veteran, mentor, role model, wife and mother I just can't wait to see what she does next.

.


Sunday, September 23, 2012

Summer into Fall


How quickly does time pass by - first it's the chilblains of winter which gives way to the promise of spring.  Then, before you know it, it is swelterin' summer - where dreams of fall and winter seem so far away that we can barely remember chilly Halloweens and snow in late November, even in Tennessee.  At this last day of summer, I'd like to celebrate the beauty of this wonderful season.  Unfortunately, now we're even wearing sweatshirts and jackets here.   Of course, that is likely to change any time!
caduta felice!  

Wednesday, September 19, 2012

You CAN Can

Canning your harvest, home-grown or purchased, is a great way to learn how fresh fruits and/ or vegetables make their way from farmland to your pantry.  It can seem scary when you first undertake a canning project since there is some opportunity to create spoiled food.  I strongly recommend reading reading the "Ball book", authored by the maker of most canning jars and supplies, before begging a project.  Ball covers home preserving, including both methods of canning, water bath and pressure, and has many recipes for you to peruse and test.


Since canning has been gaining in popularity and interest, even Williams Sonoma has a canning line and an online guide to preserving found here.

Another great online resource can be found at pickyourown.org.  Pickyourown.org lists where you can find fresh, local produce and provides many canning recipes and instruction.

Once you learn the canning basics, it is actually quite easy.  We've canned peas (of course), radishes, beets, green beans, tomatoes, okra and more.  Next spring we expect big asparagus and strawberry crops and will be preserving much of these garden treats.

Knowing exactly what is in your food is one of the greatest benefits of canning/ preserving.  And the added benefits of self- reliance - knowing how to take care of yourself and your family in the event of necessity, self-confidence of knowing that you CAN can, awareness of how commercial canning is done, and almost Emersonian self-worth.

Say you want to do more than make a couple batches of pickles or tomato sauce and the Ball book just isn't cutting for unique, delicious recipes.  Liana Krissoff, a master canner and baker, has writted a fabuolous book on canning/ preserving that has a multitude of great, new recipes for canning.  Canning for a New Generation:  Bold, Fresh Flavors for the Modern Pantry is both a beautiful book and a instructional guide to canning.

There are several entry level kits that you can use to try your hand at canning.  These are great for canning just a few jars in you existing stock pot.  Before long you'll own a large waterbath canner and a pressure canner.  Enjoy!


**Never change a canning recipe without understanding how it may affect the pH of the batch. **

Monday, September 17, 2012

Scooby Snacks!

I have a guilty pleasure.  Actually a lot of them, but close to the top of the list is :  Cheez Its.  The regular, good-oldfashioned, cheddar-y, crunchy, salty squares.  With a little dot in the middle.  And salt on the top.  Yeah, THOSE Cheez Its.

Living in the middle of nowhere means that a trip to a proper grocery store can be a long adventure.  In the meantime, I try to use what's on hand.  Finding myself with a Cheez Its craving and nothing in the cupboard, I found the expected plethora of copycat recipes on the Internet.  With bits and pieces from several recipes and a few fails along the way, I came up with a recipe for some pretty darn good Cheez Its, using all natural ingredients.  And here it is:


Homemade Cheez Its
8 ounces sharp cheddar cheese, coarsely shredded
1/2 stick unsalted butter, at room temperature
1 teaspoon kosher salt
1 cup all purpose flour
2 1/2 tablespoons ice water

In the bowl of a stand mixer fitted with the paddle attachment, mix the cheddar, butter, and salt until soft and combined. Add the flour and mix on low speed (the dough will be dry and pebbly). Slowly add the water and continue to mix as the dough forms a ball.  Pat the dough into a disk, wrap tightly with plastic wrap, and refrigerate for at least an hour.
Preheat the oven to 375˚F. Line baking sheet with parchment paper.

Divide the dough into two pieces and roll each into a very thin (1/8 inch or less) 10 x 12-inch rectangle. Using a fluted pastry cutter or sharp knife, cut the rectangles into 1-inch squares, then transfer to the baking sheets. Use the tip of a bamboo skewer (or something with similar diameter) to punch a hole into the center of each square.


Bake for 12 - 15 minutes or until puffed and browning at the edges. Watch carefully for the browning - it is easy to overcook at this point.  Immediately cool on a rack.  


Delish - and you know exactly what's in it.  Just think, this time next year I may have my own butter and cheese from our mama cows.  Now THAT'S homemade!


Sunday, September 16, 2012

Home Safe!

Amongst other topics I plan to cover in this blog is preparedness.  Preparedness for what?  For you and your family.   We in America are lucky compared to other countries and cultures. Others in the world have lived (or died) through the worst catastrophes, be they natural or man-made, while we watched, horrified, on our televisions, computers or smartphones.  Don't get me wrong, I use and love all of the things that I have access to in America.  In fact I'm typing this post on my iPhone since the iPad is charging :).

So we watch these catastrophes from afar and most people do what they can to help through monetary donations or missionary type work.  I am proud to be a "lucky American".  But I know that good things can't always last forever - so I want to be as prepared  as I can be.

One thing to consider when planning for a potential catastrophic event is to provide immediate safety for your and your loved ones.  The following article shows how to quickly make your immediate home environment safe by turning off the utilities.

Credit given to www.family-survival-planning.com for the following:


Learn How to Shut Off Utilities
in an Emergency

In case of a disaster of any type, it may be necessary to learn how to shut off utilities to avoid further damage to your family or your home. It is important that all family members learn this together.

If there is damage to your home or you are instructed to turn off your utilities:

  • Locate the electric, gas and water shut-off valves.
  • Know where to quickly find necessary tools. You may need an Emergency Gas Shut-Off Wrench.
  • Teach family members how to turn off utilities.
  • If you turn the gas off, a professional must turn it back on. Do not attempt to do this yourself.

How to shut off  your gas in an emergency:

Turning off the gas after an emergency is not always necessary. You do not need to turn off the gas unless you have reason to suspect a leak or unless you are told to do so by authorities.
You will need to know where your gas meter is before an emergency occurs.

To shut off the gas in an emergency, take these precautions:

  • If it is dark, use only battery-powered flashlights or lanterns to help you find the meter.
  • Have a wrench stored in a specific location where it will be available.
  • If you smell or hear gas escaping after an earthquake or any emergency, or if you notice a large consumption of gas being registered by the meter, turn off your gas at the meter. The male shutoff valve is located next to the meter on the inlet pipe.
  • Use a crescent wrench or an Emergency Gas Shut-Off Wrench and give the protruding valve a quarter turn in either direction so that it runs perpendicular (crosswise) to the pipe. The line is now closed.
  • Do not use matches, lighters, or open flame appliances; operate electrical switches anywhere in your home; or start a car in your garage or drive way until you are sure not gas leaks exist. Flames and sparks from electrical switches could ignite gas, causing an explosion.
  • Remember - once the gas is turned off, it can only be turned back on by a professional. In an emergency, that could take a week or more.

How to shut off your water in an emergency:

  • Look for the shutoff valve outside if you live in a warm climate. It will typically be located where the water pipe enters the house Find the water meter and you'll locate the main shutoff nearby.
  • Find your shutoff valve in the basement in cold climates - it may be set into a wall or on the water pipe leading to the water heater.
  • Locate the shutoff valves on either side of the pressure tank if your water comes from a ground well. Turn off both valves.
  • Shut off the water by turning the valve clockwise until it won't turn any more.

If you need to find the City supply shut off valve.

Search along your front boundary line for a plastic or metal cover. It's usually approximatly 12"-24" out from your fence line or curb.
To open the box:
  • Round lid: You need to insert a screw driver and turn the lid (while jiggling up and down) It will come free when its lugs line up with gaps.
  • Square or rectangle lid: Insert screw driver slot at one end and pry open.
Once you have the lid off you may now see a different type of tap top, but the principle will be the same.
  • Turn clockwise until firm.
  • Check to see if water has stopped running (front hose tap is the best.)
Tip: If shut off valve has not been off for some time, you may have to open and close a few times to free up tap thread.

How to shut off your electricity in an emergency

Electrical sparks have the potential of igniting natural gas if it is leaking. It is wise to teach all responsible household members where and how to shut off the electricity.
Preparing to Shut Off Electricity
  • Locate your electricity circuit box.
  • Teach all responsible household members how to shut off the electricity to the entire house.
FOR YOUR SAFETY: Always shut off all the individual circuits before shutting off the main circuit breaker.

Saturday, September 15, 2012

A Real Blast from the Past

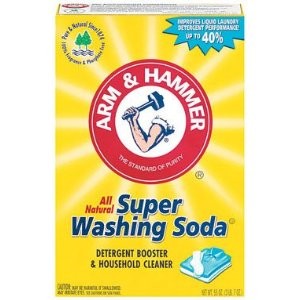
Until beginning this life adventure on the farm, I had never heard of washing soda. I’ll bet that most people today have also not heard of this product.  Even auto-correct keeps changing “washing soda” into “Washington”.  Looks like auto-correct needs some more training, but I digress.  Washing soda, actually sodium carbonate, is chemically similar to baking soda and most washing soda today is made by the historic manufacturer, Arm and Hammer.  


Since popularity of use declined over the late 20th century, washing soda can be difficult to find in local stores; however, it is easily found online. At about $3.25 for a 55 ounce box, it is an economical addition to your laundry (and other cleaning) arsenal.  

When you live on a farm, your clothes get dirty.  Really dirty.  And using the word “dirty” is using the nice word.  Thus I began my search for the best, most efficient, most economical, most in line with self-sufficiency/ homesteading, non-bleach laundry products.  Sure, no problem!  I also needed something that could blast out ground in Tennessee red clay mud, grass/ vegetation stains, general oil and grime, and the other less mentionable farm stains without totally destroying the fabric in a few washings as would bleach.  Believe me, I see the utility of bleach in some laundry situations and I use it accordingly - but bleach and I are not BFFs.  No matter how careful I am when using bleach, it seems that I always manage to get a drip or two on whatever I am wearing or on some other garment in the laundry room.  

While looking for this unknown but seemingly magical laundry product, I began making my own liquid hand soap (see earlier post for recipe).  In doing research for the liquid soap recipe, I found several recipes for homemade laundry soap.  These laundry soap recipes all had one ingredient in common:  washing soda.  Found it at the local Wal-Mart in the laundry section next to the laundry bar soaps and stain removers.  Used it once.  Bingo.  I’ve been using it when needed ever since.  

The front of the box states that it is “All Natural Super Washing Soda” and “Detergent Booster and Household Cleaner”.  The top of the box displays Arm and Hammer’s Environmental Commitment, which show that Super Washing Soda is an environmentally acceptable alternative to other household products.  While not exactly sure what that statement means, A&H washing soda has been in use since 1874 and is 100% fragrance and phosphate free.  

The back of the box displays the expected directions for use as well as a listing of the types of stains that can be removed when used as a booster to your existing laundry detergent.  To be clear; washing soda is intended to be used in addition to your regular detergent.  Put to use as an addition to my normal detergent, washing soda has drastically improved the stain removal and brightening in my laundry. I use a half cup in almost every load.  Love the stuff.  Not to sound too much like a TV commercial but even my husband noticed that our “grubby” clothes used for around the farm chores were looking better - now that’s amazing.  

Types of Stains (from the back of box):

Greasy Dirt Stains Food Stains Other Stains

- Perspiration stains - Mustard - Make-up
- Collar & Cuff stains - Chocolate - Blood
                                        - Blueberry - Grass
                                        - Cola - Clay
                                        - Meat & 
                                          Grease spatters
- Olive Oil

Chemically speaking, washing soda is a water softener.  This helps it lift stains before they completely bond to the fabric.  

Like it’s cousin, baking soda, washing soda has other applications than just laundry.  It can be used as a general household cleaner both indoors and outdoors.  It is particularly useful for cleaning kitchen or cooking grease, oils, and crayon.  Washing soda should not be used on aluminum surfaces or on no-wax floors.  It can also be used as a sink trap and drain cleaner.  I have personally used this in my slow-draining kitchen sink and one application (1/2 cup per gallon of HOT water then flush with HOT water) alone totally cleared up the problem.   

Hope this treatise on such a fascinating topic resonates with some of you, Dear Readers.  Check out washing soda.  It’s a versatile product and environmentally sound.  It doesn't go bad.  And if you decide you might want to start making your own laundry soap?  You'll need it then.  But that's a post for another day.

Until then!

** Washing soda SHOULD NEVER be used as a substitute for baking soda. ** 

Tuesday, September 11, 2012

Spring Has Sprung


Most people in the US know that summer arrives early in the South but this year was off the charts!  By the first official day of summer in 2012, we had already had more than a handful of 100+ degree days.  Take a tour from early spring (i.e. March, April) through the end of June 2012.


Saturday, September 8, 2012

Clean Livin'

Homemade Hand Soap

Homemade hand soap is easy, economical, and best of all - you choose what goes into your soap.

My recipe is adapted from others around the internet but with my own modifications for the consistency, soap brand, etc. that I prefer.  

Ingredients:

1 and 3/4 bars of Dr. Bronner's Lavender Castile Soap
1 tablespoon of glycerin (can be found in drug stores)
1 gallon of water (I use distilled)


Directions:

1.  Grate the 1 and 3/4 bars of soap with a cheese grater (I use the kind with      a box underneath to reduce the mess factor.  The 3/4 bar of soap doesn't have to be exact - just eyeball it.  Most recipes call for 8 ounce bars and my eyeball method has always worked ;) - plus if your eyeballs aren't up to the task, you can always add a little water later or cook it a little longer.  

2.  Fill a pot with the gallon of distilled water and add the soap shavings.

3.  Add the tablespoon of glycerin and heat mixture on medium heat, stirring frequently to dissolve the soap shavings.

4.  Once the soap is melted in, it will just look like soapy water.  Here's the easy part:  turn off the heat and let it sit for 10-12 hours to firm up.

5.  Stir after the 10-12 hour waiting period.  If it looks too thick, mix it with a hand mixer to be sure none of the more watery ingredients settled to the bottom.  Still too thick?  Add a LITTLE bit of water or a FEW drops of glycerin.  

6.  Pour soap mixture back into the empty distilled water jug or other container and there you are - loads of good Dr. Bronner's liquid hand soap!  

TIP:  Sometimes the soap seems to "settle" in the dispenser.  Just shake it up a bit.  If that doesn't get it thinned up, add a few drops of water and shake.  Or I add a few drops of the liquid Dr. Bronner's and shake it up. Be sparing when adding liquid - it can get watery quickly.  


There is the soap in a lovely hand blown glass dispenser made by Rebecca Zhukov at Providence Art Glass who I found where?  Etsy, of course.  Amazing glasswork of all types - and she will make custom colors/ pieces if you ask.  


Spring is in the Air


Watch Sugar Pea Farm come to life in early spring 2012.  


Blast from the Past

Sugar Pea Farm in all it's glory during Summer 2011. 


Friday, September 7, 2012

Food, Glorious Food

This was the bounty gathered in one day about a month ago.  A few recipes follow...


From the top right - this big blue trug  holds a mix of banana peppers, Jimmy Nardello frying peppers. green bell peppers,and some others I've forgetten on my old age ;)!  These peppers are all great on the grill, basted with a little olive oil and grilled in a grill basket.  However, there are only so many peppers one can eat like that before getting tired of them.  Here are a few other things I did (and am still doing!).

Stuffed Bell Peppers

Ingredients:


  • 1/2 cup brown rice
  • 1 cup water
  • 1 pound lean ground beef
  • 2 cloves garlic, minced
  • onion, chopped
  • 6 - 8 green bell peppers depending on sixe of pepper
  • 1 (8 ounce) can natural tomato sauce (or fresh home canned if you have it)
  • salt and ground black pepper to taste
  • 1 (8 ounce) can tomato sauce (or fresh home canned if you have it)

Directions:

  1. Preheat oven to 350 degrees F (175 degrees C).
  2. Bring brown rice and water to a boil in a saucepan. Reduce heat to medium-low, cover, and simmer until rice is tender and liquid has been absorbed, 45 to 50 minutes.
  3. Cook and stir beef, garlic, and onion in a skillet over medium heat until meat is evenly browned and onion is softened, about 5 minutes.
  4. Remove and discard the tops, seeds, and membranes of the bell peppers. Arrange peppers in a baking dish with the hollowed sides facing upward. Slice the bottoms off the peppers if necessary so that they stand upright.
  5. Mix the browned beef, cooked rice, 1 can tomato sauce, salt, and pepper in a bowl. Spoon an equal amount of the mixture into each hollowed pepper. Mix the remaining tomato sauce and any in a bowl, and pour over the stuffed peppers.  Sometimes I'll give them a healthy squirt of ketchup on the top!
  6. Bake in the preheated oven, about 1 hour. 

If you have many peppers to use, make a larger batch or multiple batches and freeze them for an easy dinner in the winter. 


Roasted Peppers

This is good for all types of peppers and they last for a long time in the refrigerator - if you and your family don't eat them first!  You can also can them, but mine have never lasted long enough to do so.  Just google "canning roasted peppers" and you'll find some recipes.

Ingredients:

Peppers
Olive Oil

Directions:

1.  Cut whole peppers in half length-wise, discarding the seeds and the other membrane-y stuff.  Cover a baking sheet with a rim (about one inch or more deep makes things much easier - I use a roasting pan) with foil for easy clean up.  

2.  Turn on the oven to broil and move the rack to the very top - closest to the broiler.

3.  Lightly coat the peppers with olive oil - put in a big ziploc type bag and shake it around.  Spread the peppers around in the roasting pan and place under the broiler.

4.  Since everyone likes a different degree of roasting on their peppers, start checking at about 5 minutes.  I usually let mine go to 10 or 12 minutes.  

5.  Remove from oven and let cool.  If you prefer to remove the skins, it is easier to remove them when warm (not too hot - but it's hard to get them off when totally cool).  I like the skins on for that extra roasted flavor - plus it's easier than skinning them all!  

6.  Store in a very light amount of olive oil in the fridge until they are gone!  

TIP:

I usually do a lot of peppers at a time so I have an assembly line going of chopping, oiling, placing on a second pan, broiling, removing, etc. etc. etc. until they are all done.  

Such an easy way to use a lot of peppers and certainly beats the grocery store prices (not to mention whatever preservatives they may use!  


Designing Women

Etsy, an international online marketplace for the handcrafted ranging from crocheted dishtowels to professional services, is a veritable boon for those of us who live rurally and / or are less crafty than others.  In addition to being a resource for fabulous unique gifts and home items, Etsy makes some professional services available and affordable that one would not be otherwise able to find.  Some cases in point:  the original logo for Sugar Pea Farm was created a few years ago by Shannon Phillips of idesignu in Texas.

Another is the design of this blog by Natasha Hopson of mycutelobsterdesigns.   Tasha, located in the UK, and I spent a little time emailing back and forth collaborating on the look, feel, and intent of this blog and voila, she created this fabulous template.  It seems amazing to me that from her location in the UK to mine here in Tennessee, that this template came to life!  I can't recommend her highly enough and look forward to working with her on future ventures.   Thank you, Tasha!